


Embarking on the journey to create a paid event but feeling overwhelmed by the plethora of user guides at your disposal? Fear not – we've designed this user guide to be your express route to success. Discover the key steps you need to take within the Invoice module, allowing you to effortlessly craft and manage a paid event without getting lost in the details. Time is precious, and we've got your back – let's get started on creating your exceptional event seamlessly.
- Activate the Money section in the Event
- Activate your Payment method(s)
- Configure your Journal and link it to the Event
- Configure your VAT Rules and activate them in the Event
Activate the Money section in the Event
Commence by activating payments for your events, then proceed to establish prices for your categories and options.
Modify the Pricing Plan
- Navigate to General > Essentials in your Event Module.
- Set the pricing plan to "Paid".
- Select the currency for your event.
- Click on the "Save" button.

Set a Price for your Items
- Navigate to Tickets > Category or Tickets > Options in your Event Module.
- Click on the name of your Item to modify it.
- Enter the desired price in the "Price" field.
- Click on the "Save" button.

Activate your Payment method(s)
You have the flexibility to select from three payment methods: online payment, bank transfer, or another preferred payment option. Feel free to choose one or opt for a combination of methods that best suit your needs.
Online payment
- Navigate to your Profile > Online Payment Methods.
- Click on the "Add a payment method" button and select one from the list.
- Configure the chosen payment gateway.
- Click on the "Save" button.


- Navigate to Money > Payments in your Events Module.
- Activate the Bank Transfer toggle.
- Select the Online payment gateway you will be using.
- Enter the name that will be displayed as the payment method to your attendees.
- Activate the "Automatically cancel unpaid registrations" to enable the system to cancel registrations when the payment was not made in the indicated timeframe.
- Indicate after how many hours the registration will be canceled if the participants do not complete their payment.
- Fill in the other information that will be displayed:
- Next to the payment to explain to your attendees all the details that relate to this payment method.
- On the Check-out page after a successful payment.
- In the confirmation email after a successful payment.
- On the Check-out page after a failed payment attempt.
- In the failed payment email after a failed payment attempt.
- Click on the "Save" button.

Bank transfer
- Navigate to Money > Payments in your Events Module.
- Activate the Bank Transfer toggle.
- Enter the name that will be displayed as the payment method to your attendees.
- Fill in the other information that will be displayed:
- Next to the payment to explain to your attendees all the details that relate to this payment method.
- On the Check-out page after a successful payment.
- In the confirmation email after a successful payment.
- On the Check-out page after a failed payment attempt.
- In the failed payment email after a failed payment attempt.
- Click on the "Save" button.

Other payment method
- Navigate to Money > Payments in your Events Module.
- Activate the Bank Transfer toggle.
- Enter the name that will be displayed as the payment method to your attendees.
- Fill in the other information that will be displayed:
- Next to the payment to explain to your attendees all the details that relate to this payment method.
- On the Check-out page after a successful payment.
- In the confirmation email after a successful payment.
- On the Check-out page after a failed payment attempt.
- In the failed payment email after a failed payment attempt.
- Click on the "Save" button.

Configure your Journal and link it to the Event
Create an Invoice Journal
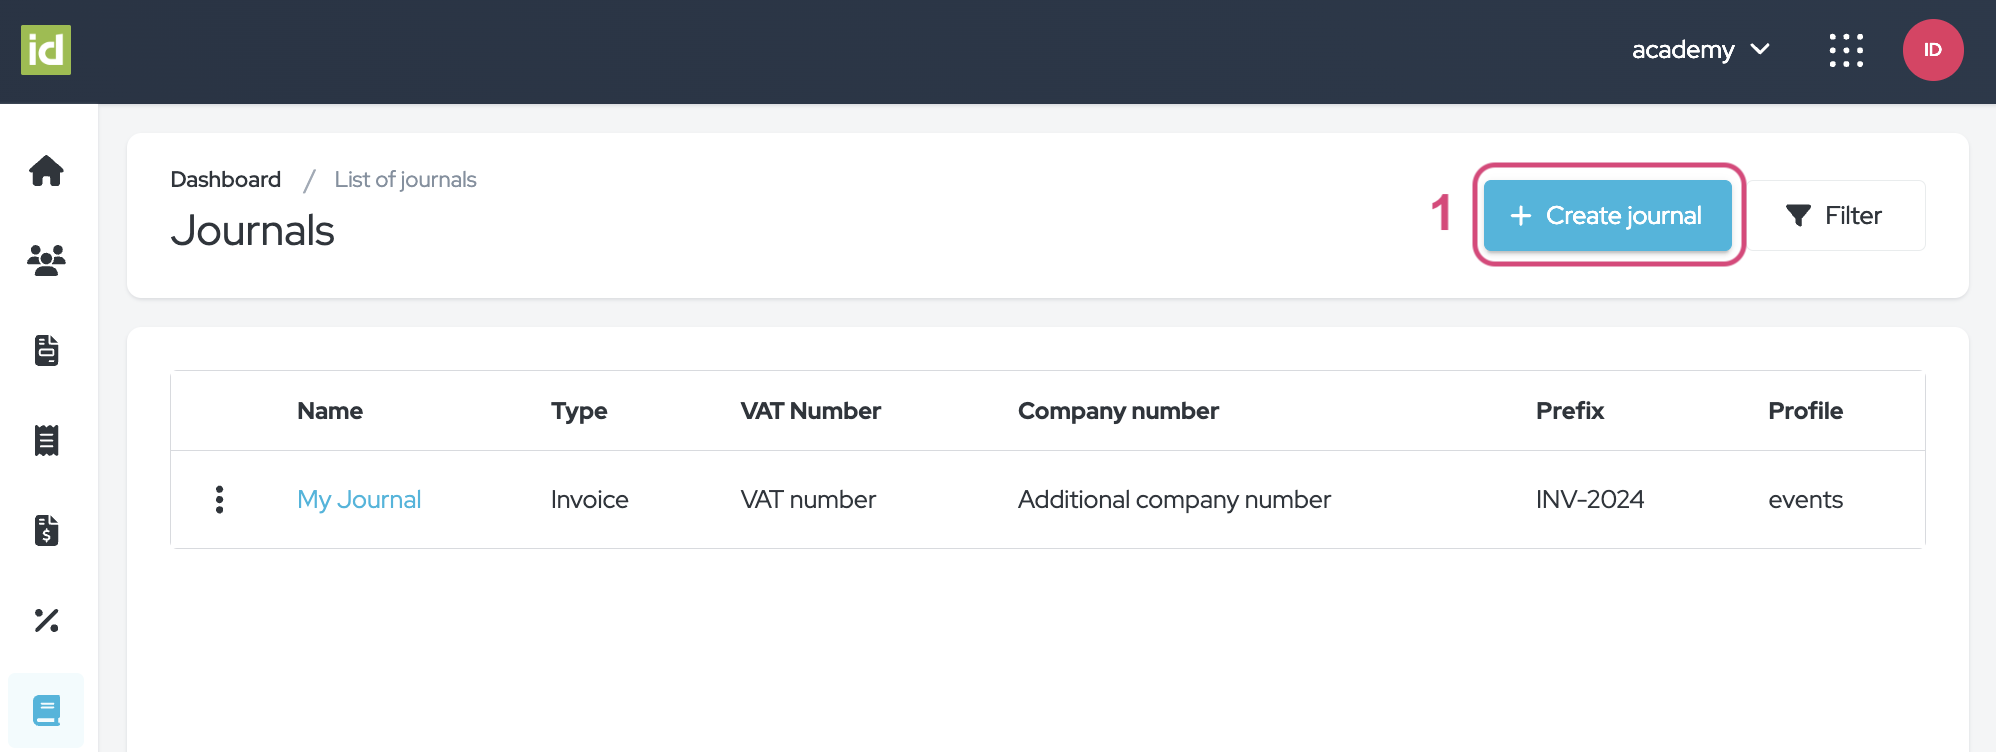
Navigate to the Journals section of the Invoice Module.
- Click on the “Create Journal” button.
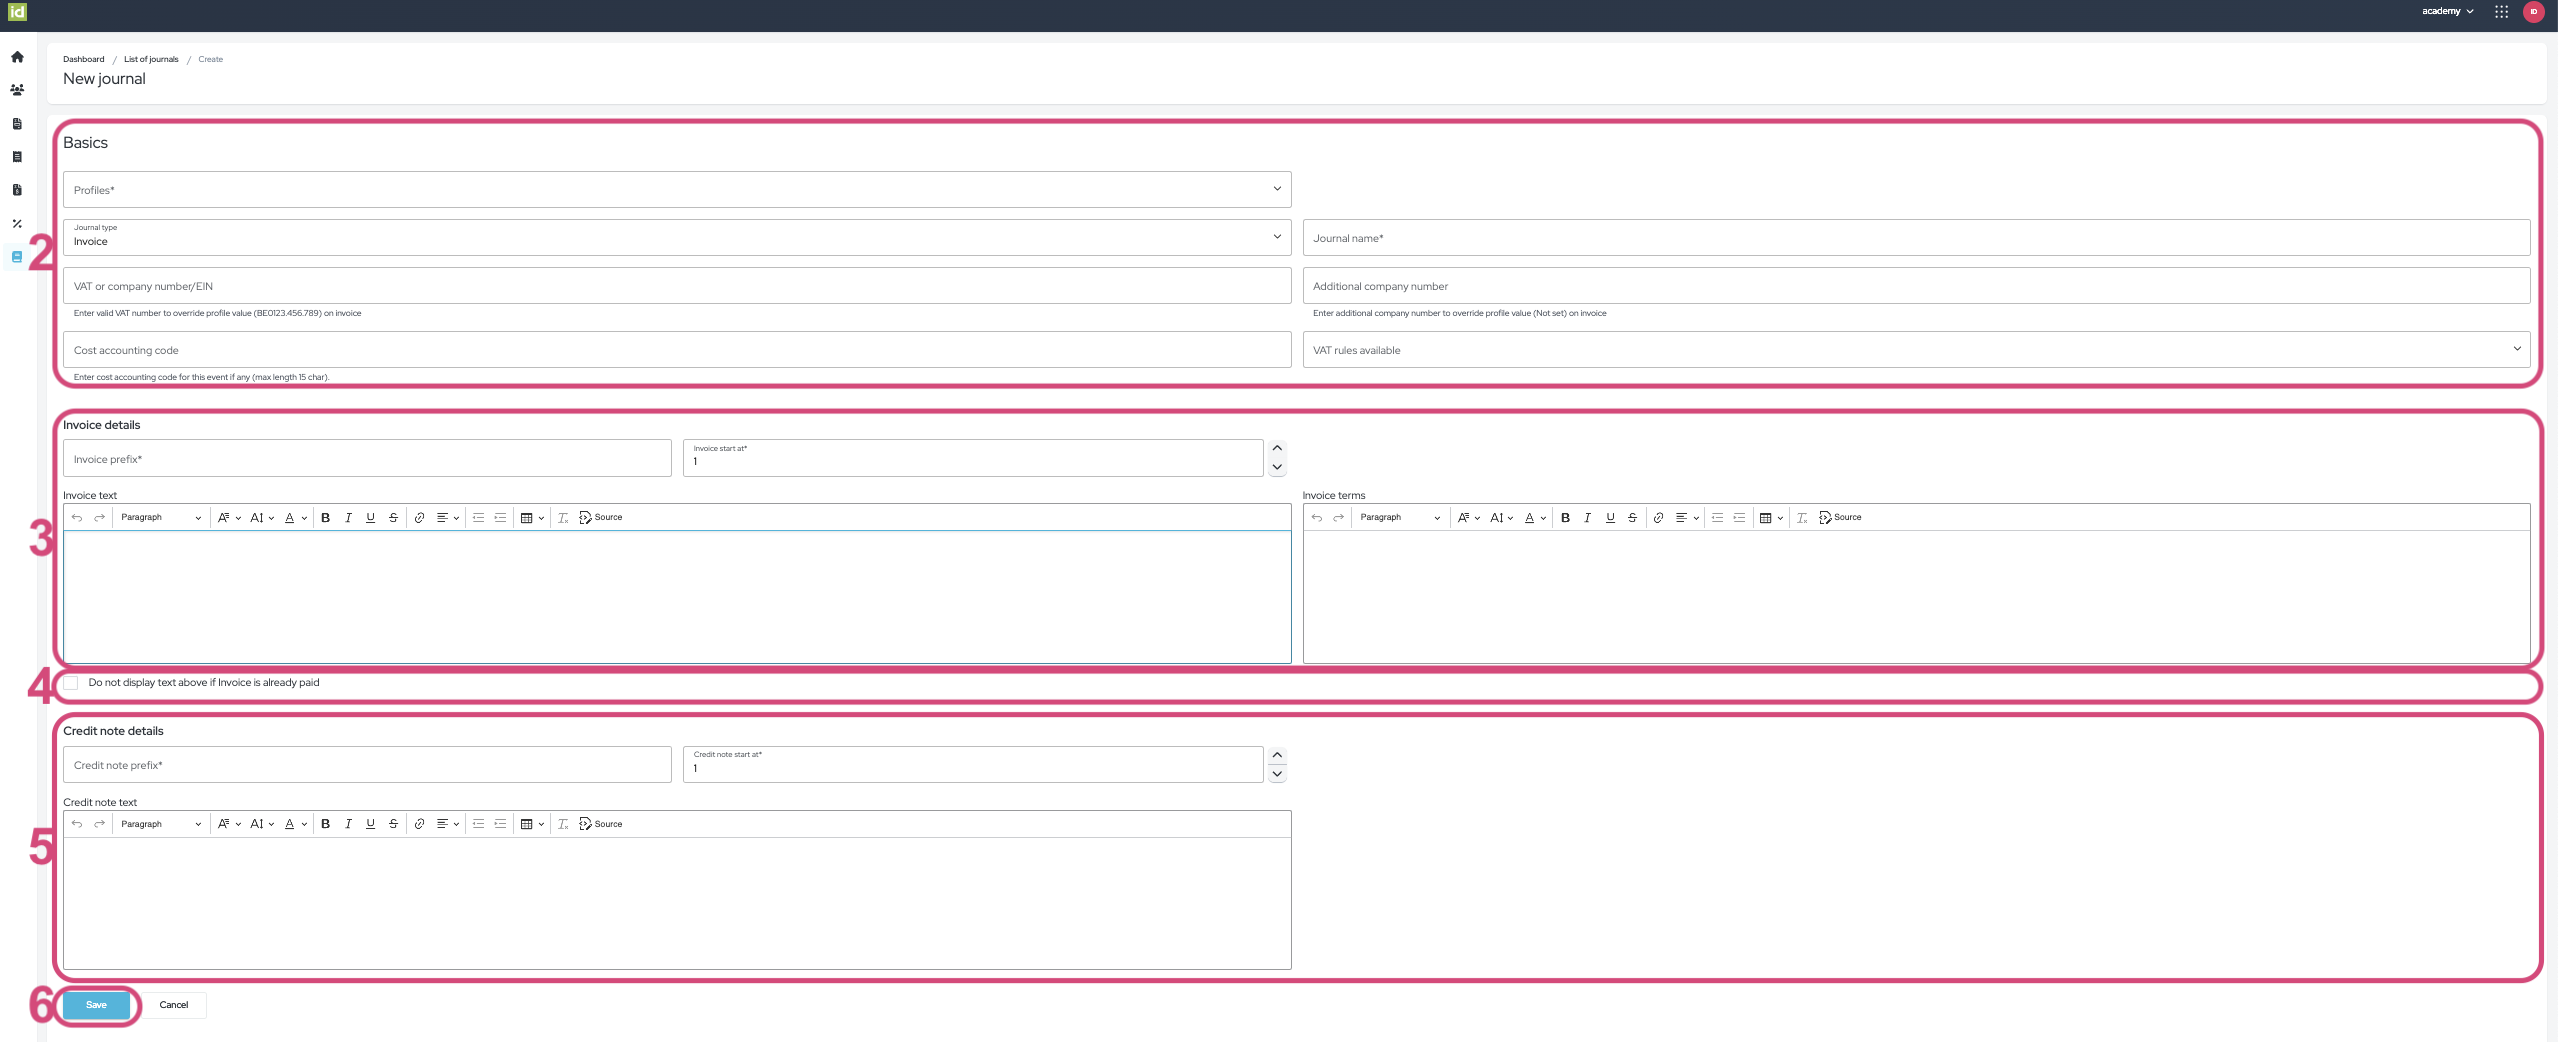
- Fill in the necessary information in the “Basics” section:
- Profiles - This field is mandatory. Select the profile the Journal will apply to.
- Journal type - By default the type is set to “invoice”.
- Journal name - This field is mandatory. Enter the name that will be used for your Journal in the backend.
- VAT or company number/EIN - This field is not mandatory. You can enter a valid VAT number to override the value of the Profile on the invoice.
- Additional company number - This field is not mandatory. You can enter an additional company number to override the value of the Profile on the invoice.
- Cost accounting code - This field is not mandatory. You can enter a Cost accounting code if necessary.
- VAT Rules available - This field is not mandatory. You can link your Journal to the VAT Rules you created earlier. Once linked, you'll have the option to choose from all linked VAT rules when you link your Journal to an Event.
- Fill in the necessary information in the “Invoice details” section:
-
Invoice prefix - This field is mandatory. You can define the prefix to use on your invoices. For instance, all your invoices will start with INV-2024 (or the date of your event).
-
Invoice start at - This field is mandatory. Specify the starting number for the first generated invoice. By default, the numbering starts at 1.
-
Invoice text - This field is not mandatory. You can enter the text you would like to be displayed on your invoices.
-
Invoice terms - This field is not mandatory. You can enter the text you would like to be displayed in the terms on your invoices.
-
-
If you would like the Invoice text only to be displayed if the Invoice has not been paid yet, click on the “Do not display text above if Invoice is already paid” checkbox. Then, the terms will be displayed on the invoice but the text will not.
-
Fill in the necessary information in the “Credit note details” section:
-
Credit note prefix - This field is mandatory. You can define the prefix to use on your credit notes. For instance, all your credit notes will start in CN-2024 (or the date of your event).
-
Credit note start at - This field is mandatory. Enter the number that you would like to be displayed on the first generated credit note. By default, the numbering starts at 1.
-
Credit note text - This field is not mandatory. You can enter text you would like to be displayed on your credit notes.
-
-
Click on the “Save” button.
Link your Journal to an Event
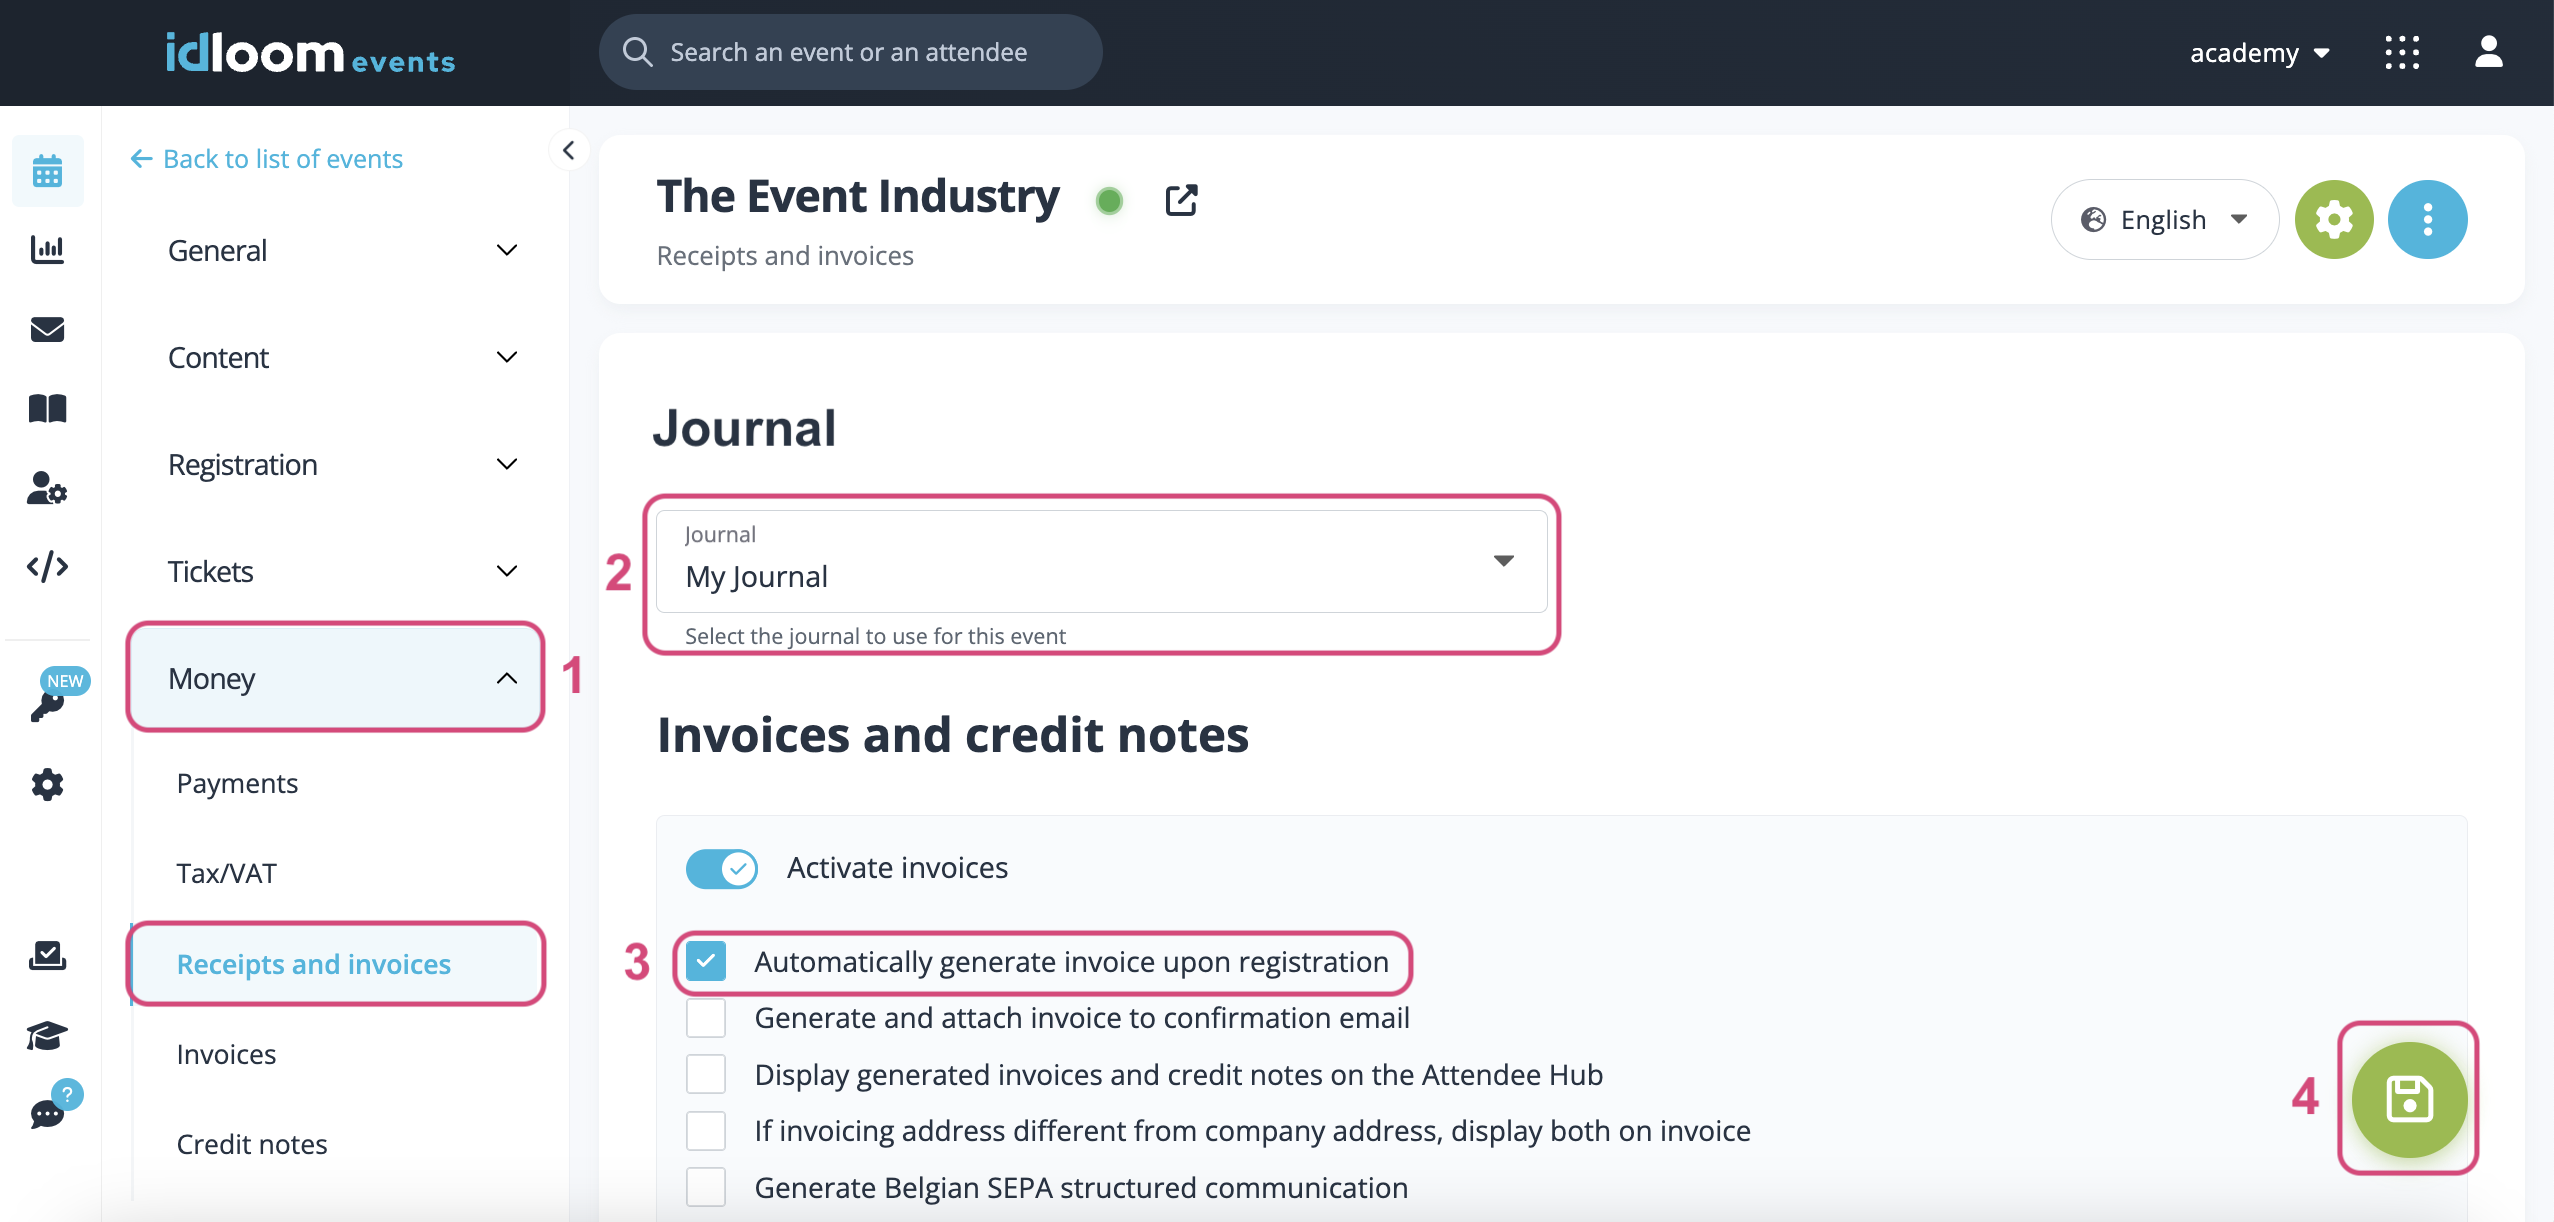
Creating invoices requires the mandatory step of linking a journal to your event.
- Navigate to Money > Receipts and invoices in idloom.events.
- Select the desired Journal from the list of “Journal” available.
- Check the "Automatically generate invoice upon registration" for invoices to be generated automatically.
- Click on the “Save” button.
Your Journal now applies to the Event and all financial information from the event will be displayed in the Invoice Module.
Configure your VAT Rules and activate them in the Event
VAT Rules
VAT Rules outline the VAT conditions that relate to your Journal. You can link several VAT Rules to your Profile and assign them based on the Event or Item.
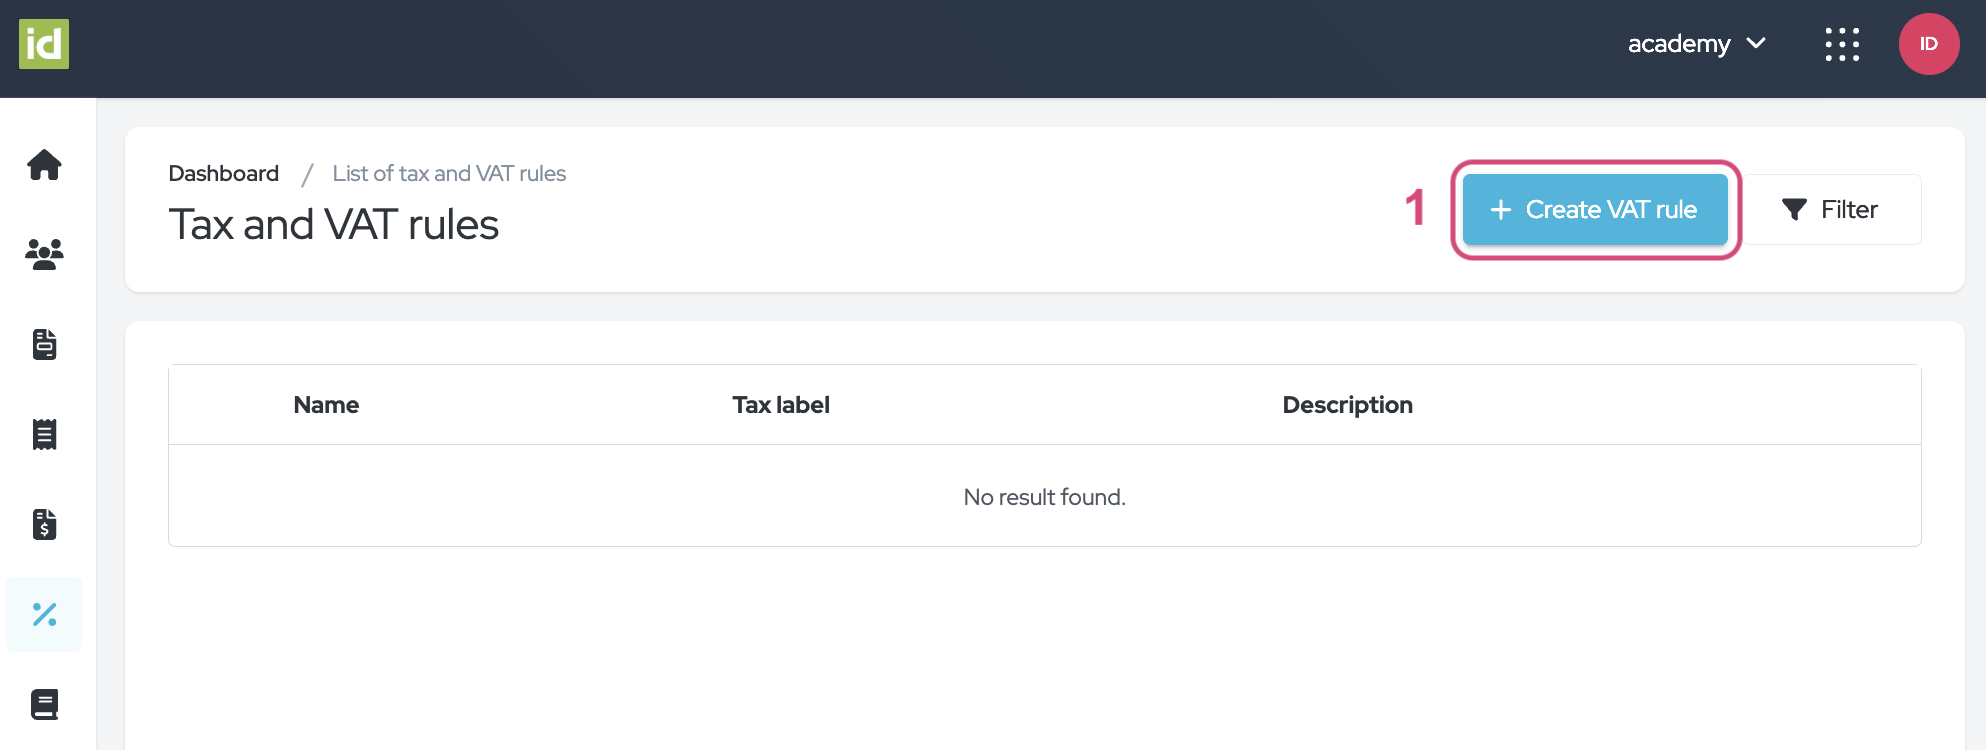
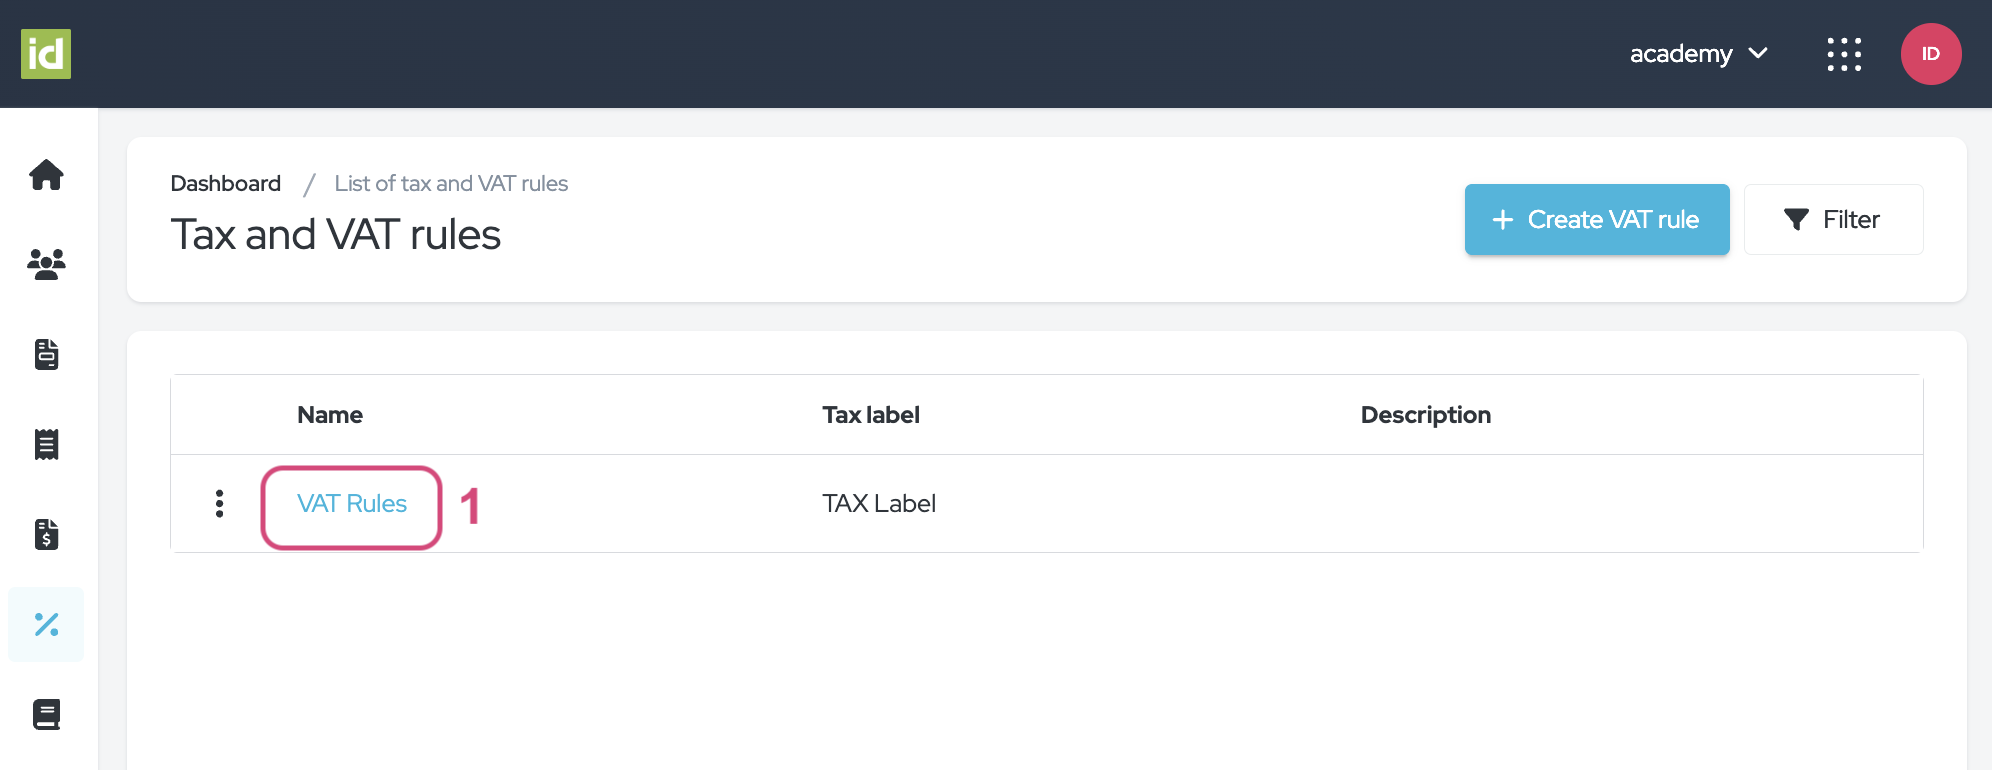
Navigate to the Tax and VAT rules section of the Invoice Module.
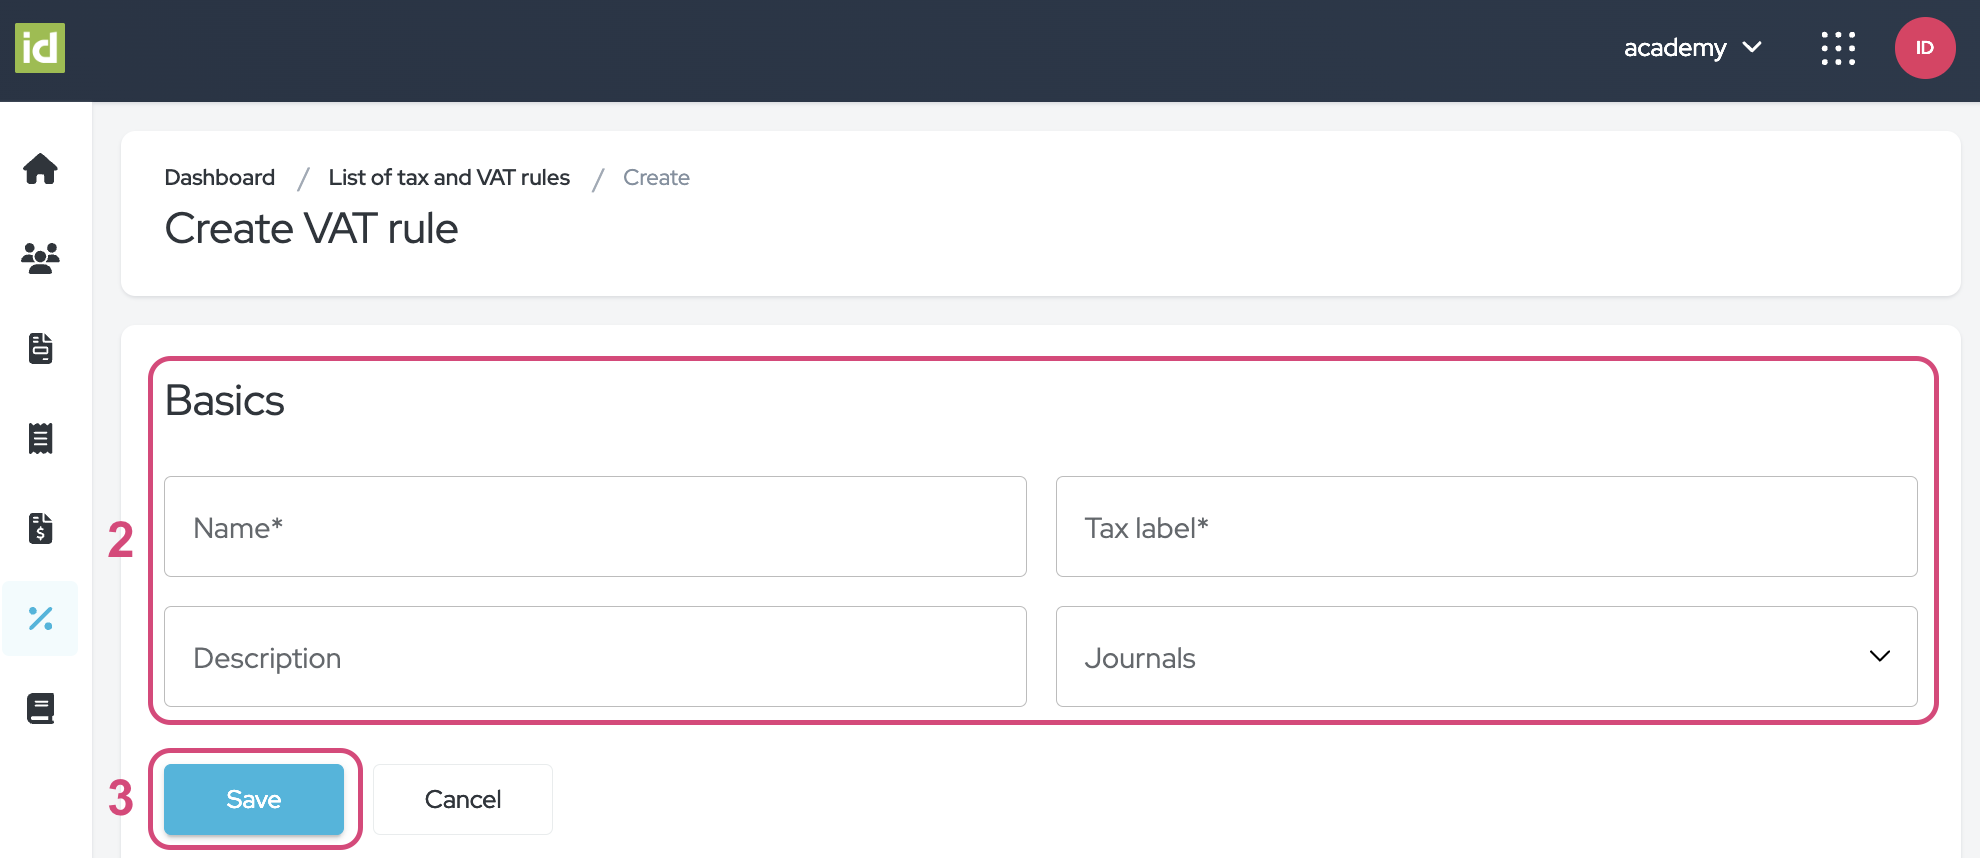
- Click on the “Create VAT rule” button.
- Fill in the fields:
-
Name - This field is mandatory. Enter the name you would like to give your condition. This will be the name for your rule in the backend for the users in your profile to see.
-
Tax label - This field is mandatory. Enter the name you would like the customers to see on their invoices.
-
Description - This field is not mandatory. You can add a description to your VAT rule.
-
Journals - This step is not mandatory. You can link your VAT rule to one or multiple Journals if you have already created journals.
-
- Click on the “Save” button.
VAT Conditions
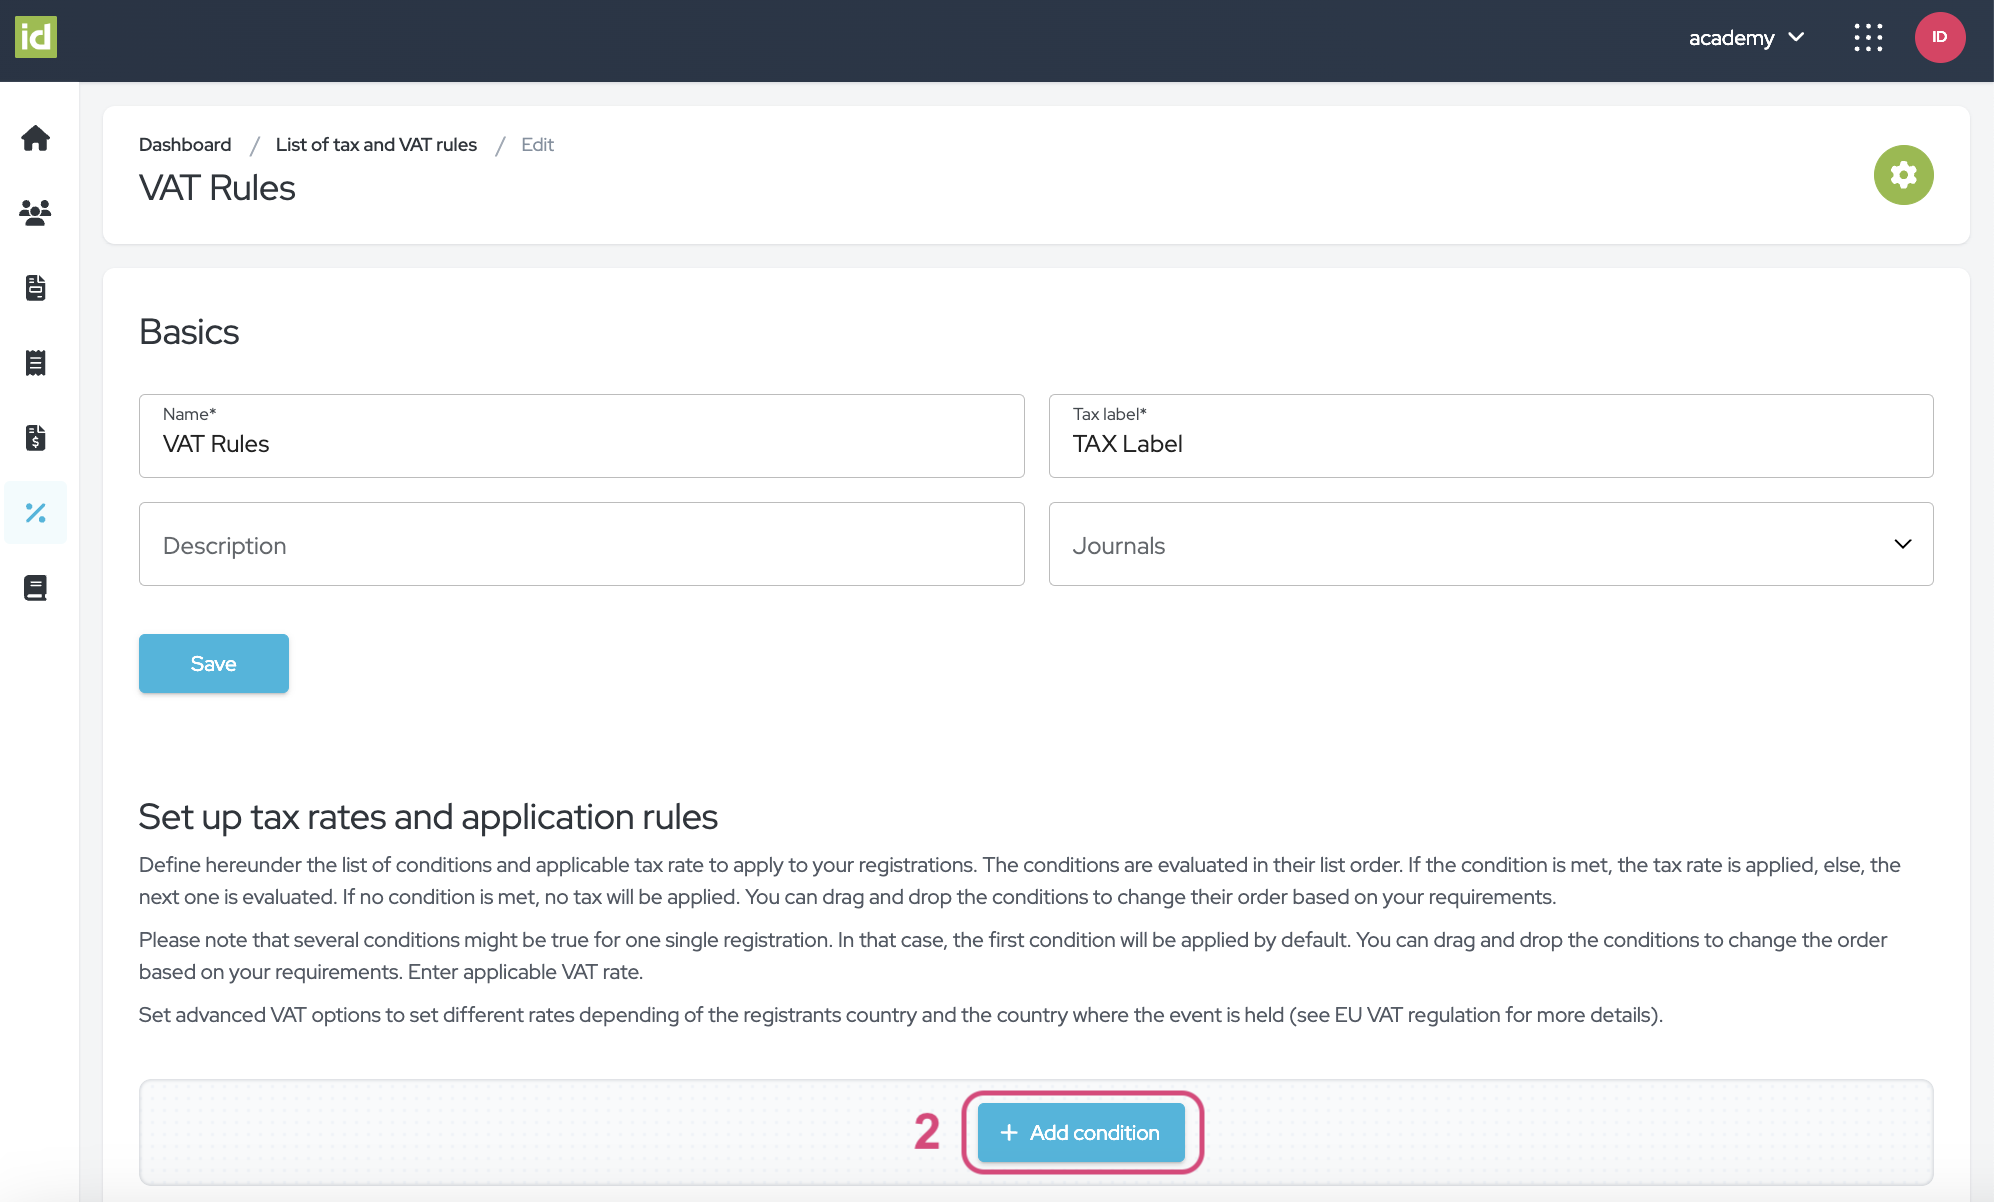
Please note that the conditions are evaluated in their list order. You can drag and drop the conditions to change the order based on your requirements using the six-dots button. If the first condition is met, the related tax rate is applied, if not the next condition is evaluated. If no condition is met, no tax will be applied. Also, several conditions might be true for one single registration. In that case, only the first condition met will be applied.
- Edit a VAT Rule.
- Click on the “Add condition” button.
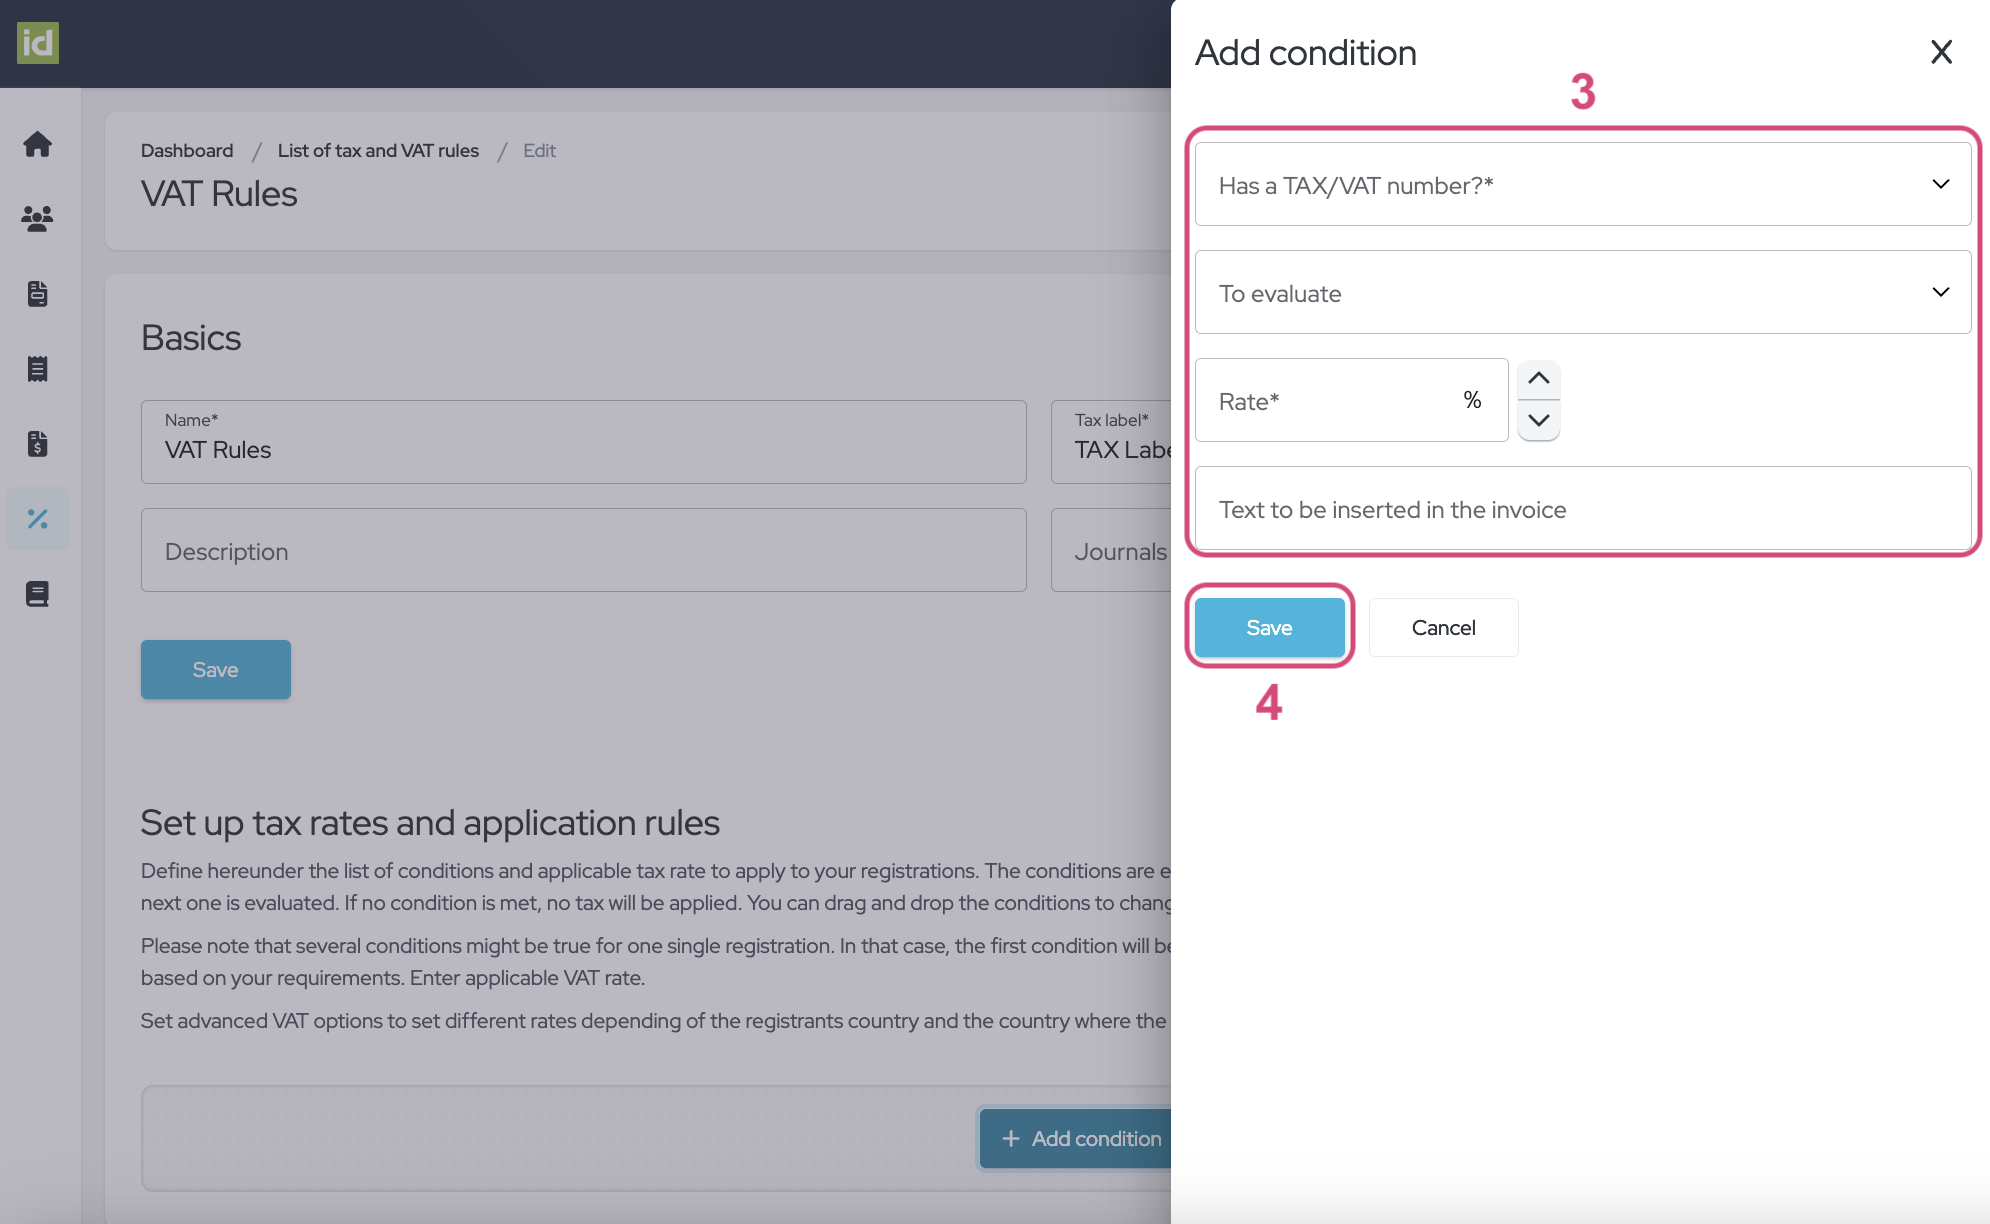
- Fill in the Condition fields:
-
Has a TAX/VAT number? - This field is mandatory. Define if the rules only apply to Attendees who have indicated a VAT number, have not indicated a VAT number, or if it does not matter if the Attendee has indicated one or not. In the last scenario, use the “indifferent” choice from the list.
-
To evaluate - This field is not mandatory. Indicate what field from the registration form you want to evaluate. It can be the Country of the Attendee, their State, their VAT number, or both their Country and VAT number. Please remember that the system will take into account the default fields from the system.
-
Condition - This field will appear once you select an item in the “To evaluate” field. Specify what condition needs to be fulfilled.
-
Rate - This field is mandatory. Indicate the rate that should be applied if the conditions are met.
-
Text to be inserted in the invoice - This field is not mandatory. This is what will be displayed next to the VAT rate on the invoice, proforma, or credit note.
-
- Click on the “Save” button.
Event-level
Do you need to apply the same VAT Rules on all your Categories and Options?
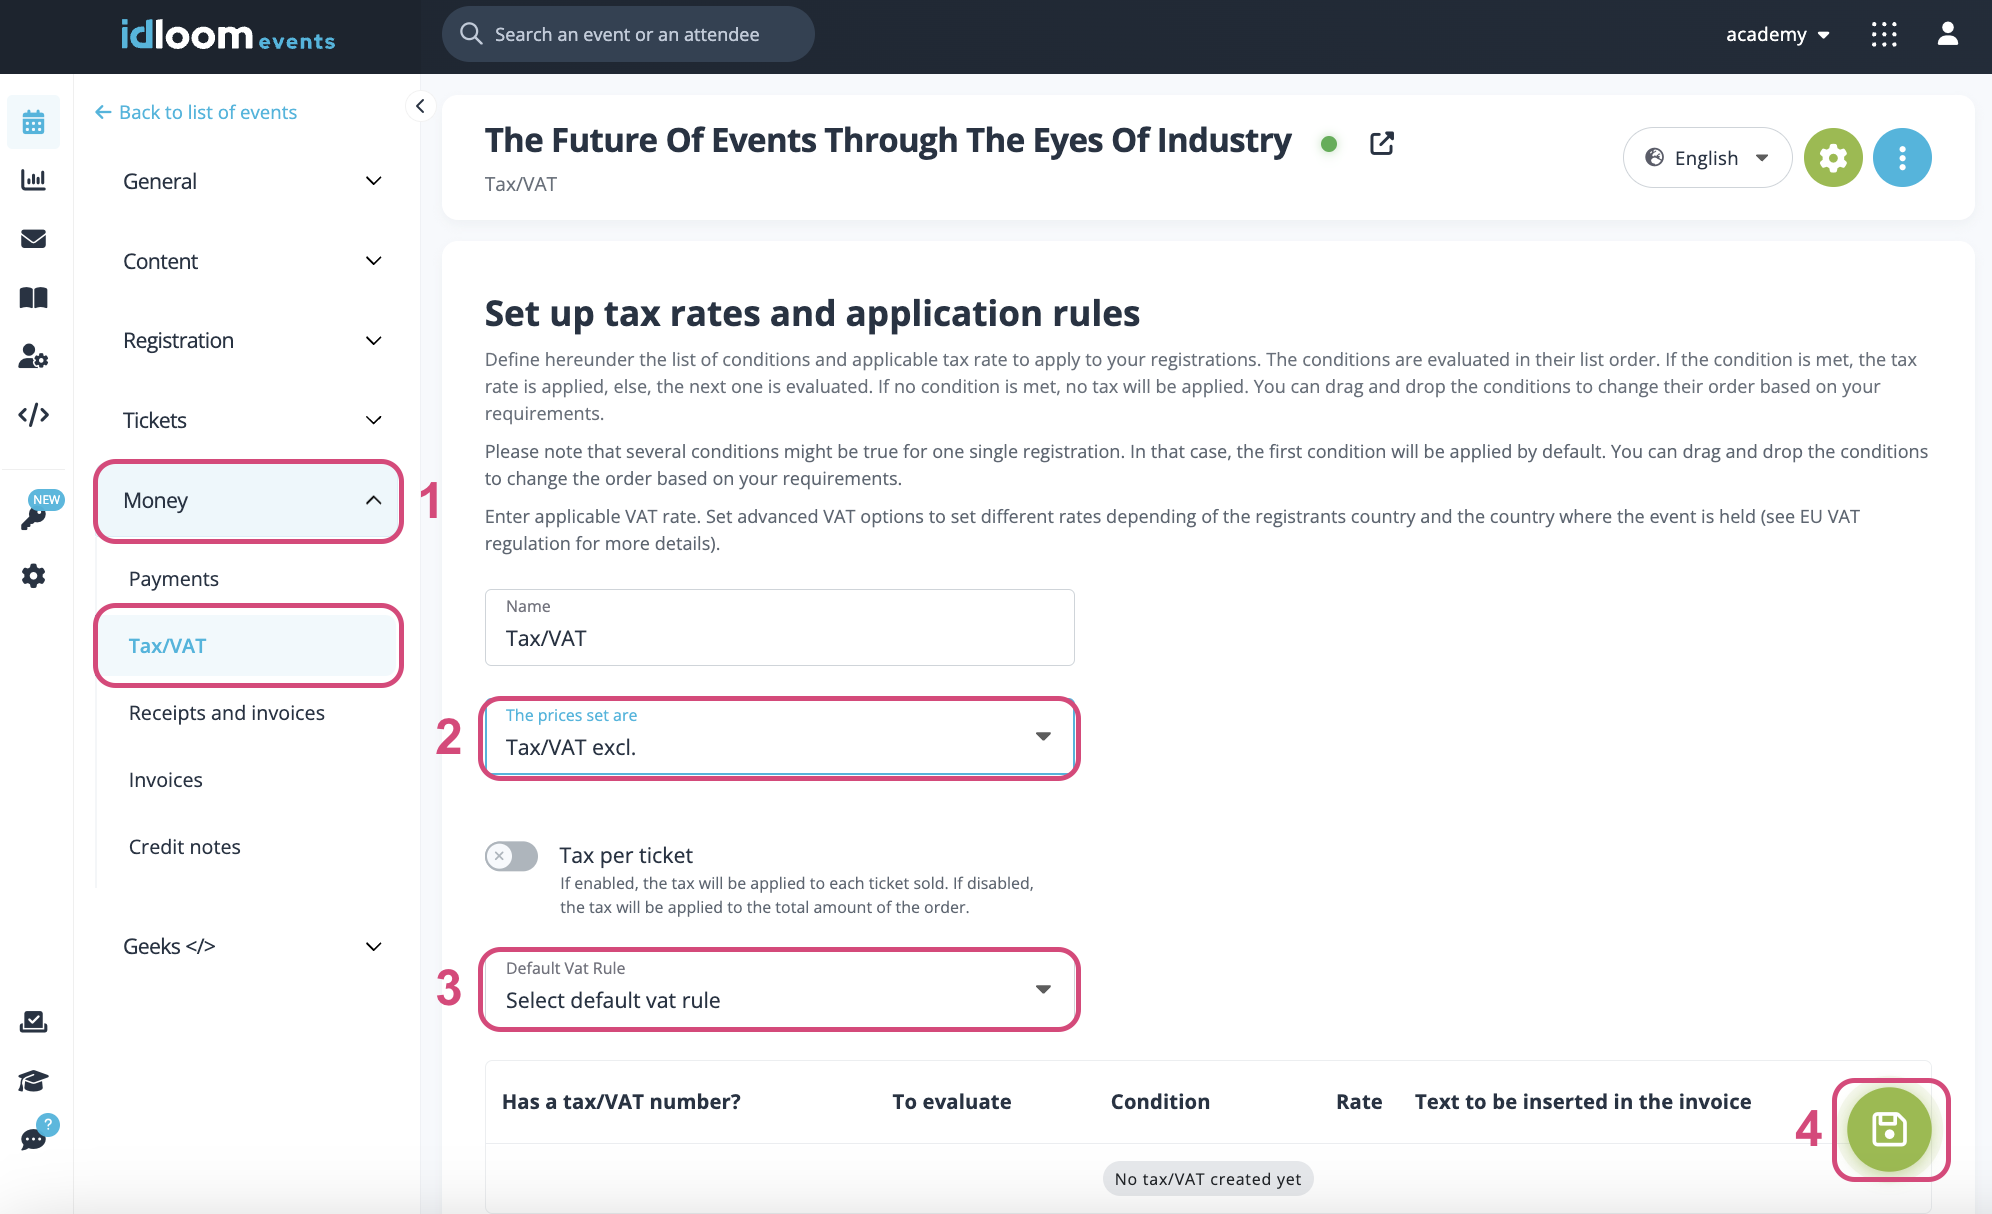
- Navigate to the Money > TAX/VAT section.
- Select the Type of VAT you would like to apply (VAT inc. or excl.).
- Select your VAT Rule from the “Default VAT Rule” list.
- Click on the "Save" button.
Your Rule now applies to the whole Event and you will see an overview of your Conditions below the "Default VAT Rules" field.
Item-level
Do you need to apply various VAT Rules on certain Items?
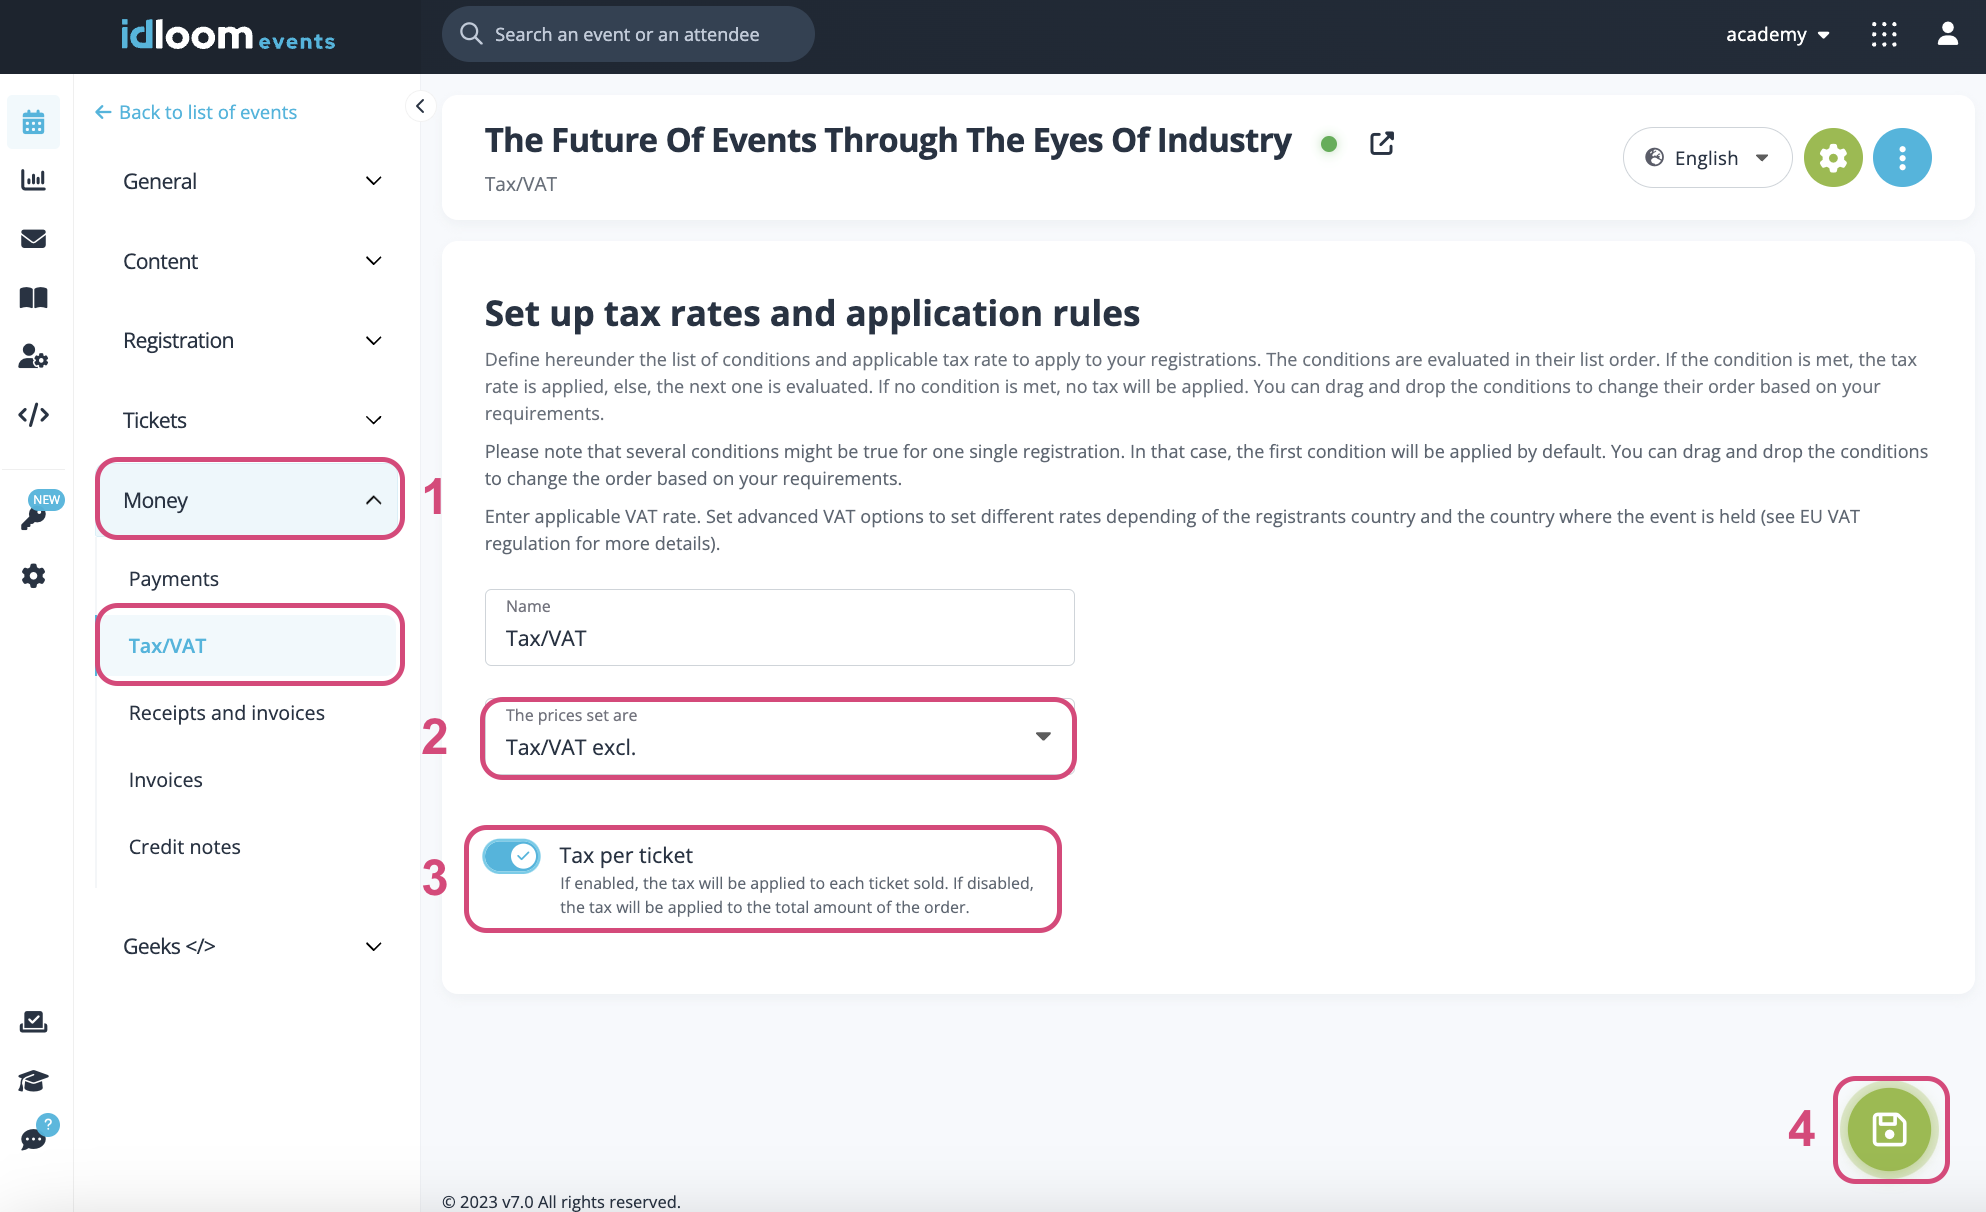
- Navigate to the Money > TAX/VAT section.
- Select the Type of VAT you would like to apply (VAT inc. or excl.).
- Activate the “Tax per ticket” toggle.
- Click on the "Save" button.
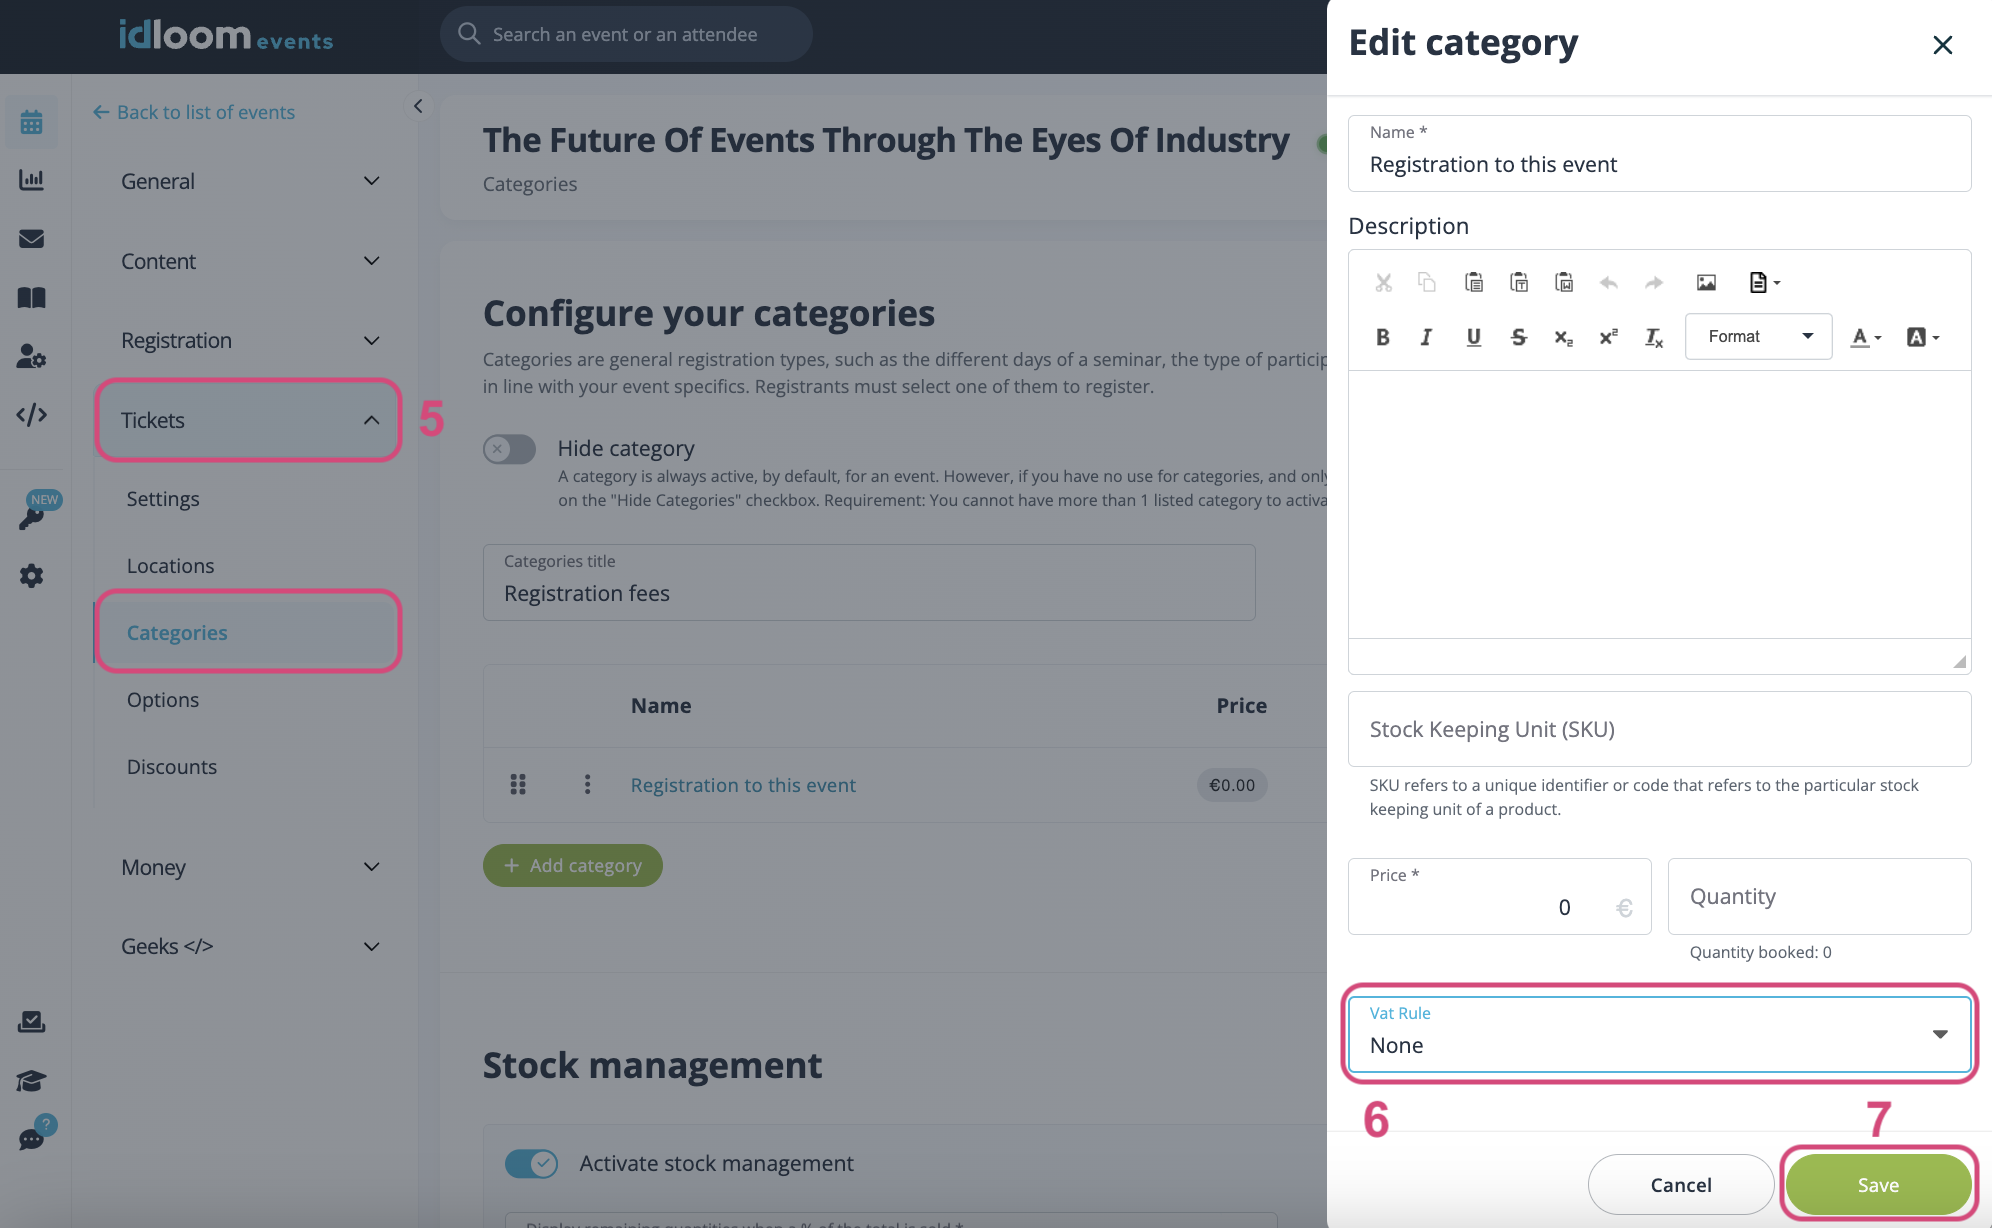
- Navigate to Tickets > Categories or Tickets > Options.
- Click on the item you would like to apply the VAT Rule on.
- Select your VAT Rule from the “VAT Rule” list.
Your Rule now applies to the Item. Repeat for other Items.
We wish you a lot of success with your paid event!
Discover related user guides. You might also be interested in…
The idloom.events team