Introduction
APIs and webhooks in idloom provide powerful tools for automating workflows and integrating with external systems. By leveraging APIs, users can seamlessly sync data between idloom and other softwares, allowing for a more efficient event management process. Webhooks, on the other hand, enable real-time triggers, ensuring that specific actions or notifications occur automatically when certain events take place within the platform.
These features are ideal for event organizers, developers, and IT administrators who want to customize and extend the platform’s capabilities. Using APIs and webhooks helps streamline operations, reduces manual tasks, and ensures smoother data handling, ultimately enhancing the overall event management experience.
Getting started
At idloom, we firmly believe in data ownership, and the data you collect is entirely yours. That’s why our integration modules are available starting from the light version, allowing you to seamlessly integrate idloom into your software ecosystem, whether you’re a frequent or occasional user.
Navigate to the integration section of the Events App and begin a new integration. You can select from a predefined set of native integrations or create a custom one, which we will explore further below.

Custom Integration
The integration consists of four key building blocks:
-
Basic Settings: Define the integration’s name, the profile that will use it, whether it will be used for API calls, and, if so, the required API Key.
- Automatic Configuration: When connecting your registration forms to another application, you must establish a fixed structure. This ensures consistent fields across all registration forms, allowing you to send structured data to the external app. This is handled through the Advanced Registration Form Settings.
- Field Mapping: To ensure compatibility with your external app, you may need to customize the data payload. This is where the API Field Mapping feature comes into play.
- Webhooks: For real-time data transmission to your external app, enable and configure webhooks, and associate them with idloom triggers to automate the process.
Enable Profile Data Access
With the integration you’re building, you can access event and registration information through APIs or trigger webhooks. To achieve this, you’ll need to connect the relevant profile to the integration and enable API access.
For enhanced data security, we recommend minimizing profile data exposure:
- Create separate integrations for accessing different profile data.
- Enable API access only when necessary.
- Generate a new API key when transitioning from development to production, and rotate it regularly (e.g., every 6-12 months).

Create and Manage Webhooks
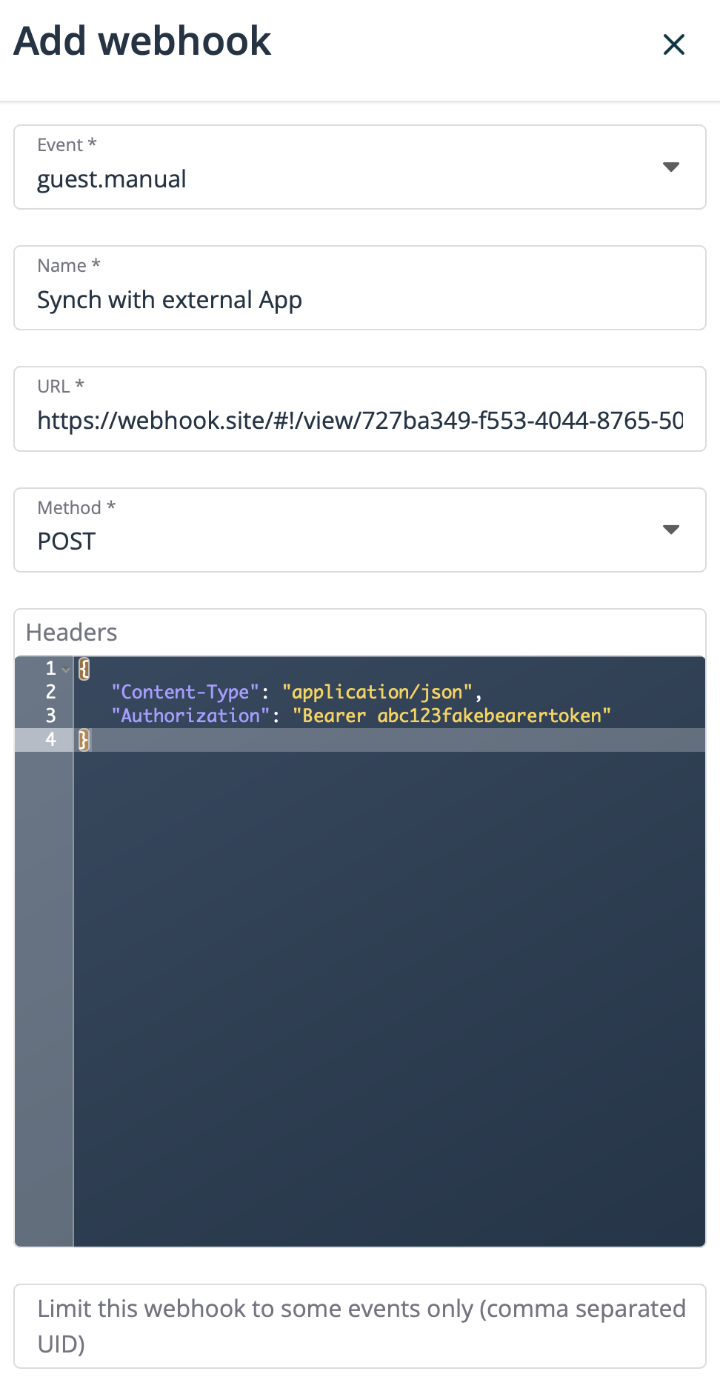
Start by adding a webhook and selecting the trigger you want to activate for the webhook:
- event.create, event.update, event.delete, event.manual: These triggers will send a REST event payload to your endpoint, using the same format as the API Get Events method. The manual trigger also adds a new option in event-related actions, accessible through the list’s contextual menu or the “More actions” menu in the event details screen.
- guest.create, guest.update, guest.delete, guest.manual: These triggers will send a REST attendee payload to your endpoint, using the same format as the API Get Attendees method. The manual trigger also adds a new option in attendee-related actions, accessible through the list’s contextual menu or the “More actions” menu in the attendee details screen.

Next, you can specify the webhook name, the URL to send the payload, and the HTTP method to use (GET, POST, PUT, DELETE, PATCH). If you’ve selected a manual trigger, the webhook name will become the label for the new function in the menu.
You can also configure request headers, such as Bearer Tokens or other security settings.
If you want to restrict the webhook to specific events, simply enter their UID values, separated by commas. You can find this information in the Geek > Analytics & Tracking section of your event settings.

Activate Integration Webhooks in Your Profiles
You’re nearly there. While connecting an integration to profiles and enabling API access automatically provides access to all profiles via API calls, this isn’t the case for webhooks.
To activate webhooks for a specific integration, go to Events Profiles, select a profile, and navigate to Geek > Integrations. From there, activate the desired integration. Keep in mind that only one integration can be active per profile at a time.

Override Profile’s Default Integration for a Specific Event
The good news is that regardless of the webhooks activated for a profile, you can still override them for a specific event. Simply go to the Geek > Integrations section of the event settings, choose the integration you want to apply, adjust or override field mappings if necessary, and even choose to trigger webhooks when a registration is paid.

Need More Customization?
If you require extra processing or validation before sending the payload, or enhanced security with two-way SSL, please reach out to your account manager, who will forward your request to our technical team.
We are committed to providing the best possible documentation, even for technical content. If you have any questions or suggestions, please feel free to reach out. Your feedback will help us improve this user guide and the FAQ section.
Enjoy!
The idloom team
